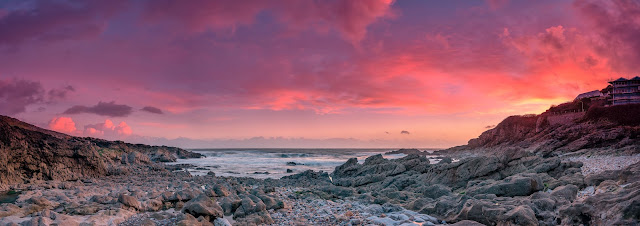
Everyone knows that the best time for taking landscape photographs is during the “golden hour”; that period of time around sunrise and sunset each day.
I much prefer making images at dawn. There are fewer people around, less traffic and easier parking than later on in the day. That and I can be home and back in bed before everyone else in the house has woken up!
Sometimes though you just have to chase the light. If there’s no chance of getting a good sunrise due to cloud cover, then at least there’s the other end of the day to hope for better weather and light.
I use a couple of iPhone apps to help to plan my expeditions. Dark Skies is an excellent weather forecasting app, and Clear Outside gives a far more detailed description of cloud cover and, more importantly, where in the sky that cloud will be.
So, when Dark Skis predicted clearing skies following hail, and Clear Outside suggested there would be more high cloud than low, I decided to make my way to the Mumbles (again) and in particular to Limeslade Bay where I knew that at this time of the year (mid-March at the time of writing this) the sun sets behind the headland to the west of the bay.
On the way there we were battered by a torrential hailstorm, and the black skies looked like they would ruin any chance of getting a decent image. But, just as the forecast predicted, the skies cleared leaving a thin veil of cloud on the horizon but crucially, good helping of higher cloud that would catch “fire” as the sun set.
I wanted to capture the whole bay, from the headland in the east to the one in the west, so decided to shoot a panorama of a number of images which I would later stitch together on my computer.
Shooting panoramas is not as easy as it sounds. It’s crucial to get your tripod’s base plate absolutely level before attaching your camera (in portrait orientation), and then levelling the camera accurately as well. If you don’t, you’ll end up with a mess of images that you just can’t stitch together later. You can buy special tripod heads or attachments to make this a more exact science, but at the moment I don’t have one.
It’s also essential to put your camera into full manual mode as you don’t want the exposure or white balance to change in between images and ruining the final result. Focusing can also be a problem. I find it best to manually focus on the horizon and use a small aperture to ensure that most of the image is acceptably sharp.
After setting up and scanning the whole image while studying the camera's histogram to make sure there were no extremes of bright and dark spots across the scene, I shot a series of images panning from east to west and making sure each frame overlapped by at least a third over the preceding one. To capture the whole bay on this occasion took eight images. I also used a graduated filter to ensure I could balance the exposure between the sky and the land.
Editing the image was quite simple as Adobe Lightroom does most of the stitching work for you. It’s then just a case of cropping the image to eliminate any empty areas around the edges and then applying normal editing techniques to get the image “just so”.
The result you see here is a massive 85-megapixel file which, if I wanted, could be printed on an enormous scale. It’s one that I’m very happy with and am glad that I trusted in the apps I use to gauge the weather conditions.
Technical Information
Equipment used:
- Fujifilm GFX50R medium format digital camera
- Fujinon GF 32-64mm f4 lens at 64mm
- Formatt Hitech 4-stop reverse graduated filter
- 3-Legged Thing tripod and Airhed 1 ball head
- Remote shutter release
Exposure details:
- Shutter: 1 second
- Aperture: f14
- ISO: 100
NB the contents of this post, including the image, are © duringthemeanwhilst

Comments
Post a Comment